Valentine’s day is approaching fast. If you are still looking for a last-minute, yet creative gift, don’t despair! We might just have the solution for you: a 3D printable Valentine’s gift in the form of a heart-shaped bookmark.
More…
As we know only too well, CAD modeling can be daunting, especially if you are a complete novice in the field. That’s why for this tutorial we have decided to team up with the guys at Shapr3D, a CAD software which is easy to learn, easy to use, but that still meets professional standards. And it is perfect for 3D printing projects.
In order to show you how easy it can be to get started with your first project, Daniel Rosner from Shapr3D wrote this step-by-step guide to create a heart-shaped bookmark, which you can print for your special someone. Like this, you will learn how to model a file and, at the end, you will have a personalized gift for Valentine’s day – how awesome is that?
Main page of Shapr3D © Shapr3D
As we know that step-by-step guides can sometimes be a bit boring, we also made you a step-by-step movie, which explains in less than 5 minutes how to design your heart-shaped bookmark. Have a look for yourself:
If you wish to skip the tutorial and just download the heart-shaped bookmark in order to print it, have a look at the end of this article.
So, without further ado, here is the tutorial on the basics of 3D modeling with Shapr3D. Fire away Daniel:
Basics of 3D modeling: Creating a bookmark with Shapr 3D
This blog post will walk you through the very basics of creating print-ready 3D designs in Shapr3D, a professional 3D modeling tool, and will show you how to print those designs the easiest way. Since Valentine’s day 2017 is on the horizon, we wanted to show you how to design a simple object that fits the occasion. We found the inspiration for the bookmark on Thingiverse, as we were looking for a basic but interesting object, i.e. a perfect fit for a beginners tutorial. Have fun learning.
More…
We used the following tools to create the bookmark:
- iPad Pro
- Apple pencil
- Shapr3D (CAD software – runs on the iPad Pro)
- Craftbot (3D printer)
- Craftware (the slicer software that comes with the Craftbot 3D printer)
– Swipe left/right to see more
iPad Pro, Apple Pencil © Apple Inc. – Craftbot 3D printer © 3dprintingforbeginners.com
A. The basic concepts
Before we jump into the design work, there are two important lessons we would like you to understand. These lessons will actually shape the way you think, when you approach a design work. Although it might make everything a tad more difficult in the beginning, but it will definitely pay its dividends in the long run.
1. Always go from 2D to 3D
3D modeling always starts with a 2D sketch. Your sketch should be as simple as possible. This basic rule of thumb will help you get started even when you’re faced with a formidable object, like a turbine. (A turbine is, after all, just a combination of curved lines on top of a circle). This will also give you a bigger freedom when you start adjusting your object.
2. Make sure you understand your goals and the specifics
Before drawing anything, you should have a detailed look at the object you want to create. Do you know the size of your object, the width, the height and the length? Make sure you have these basics under control before you jump into anything.
We made your life easier and have the calculations for the bookmark ready. Our heart will be made up of 2 arcs and 2 lines connected to them. Here are the parameters:
- Total length: 50mm
- Total width: 50mm
- Height: 3mm
- Total width: 50mm
- Arc radius: 12,5 mm
- Big circle width: 1,5mm
- Scale of the smaller circle in comparison of the bigger one: 0,8mm
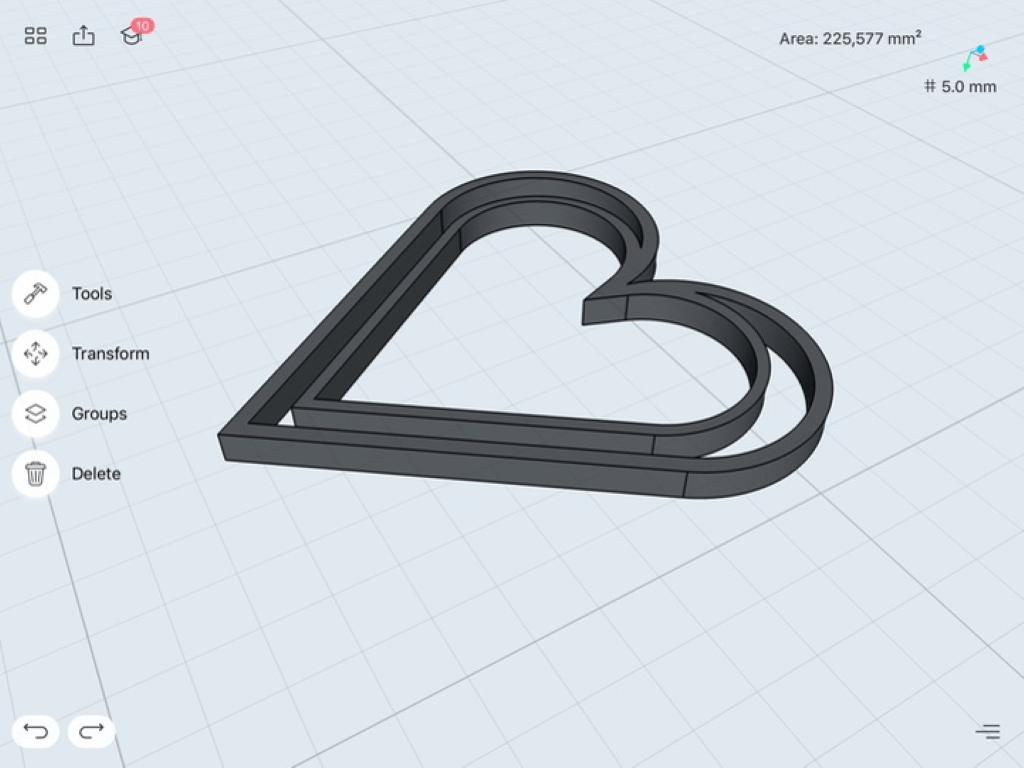
Heart-shaped bookmar parameters © Shapr3D
B. Modeling the bookmark
There are multiple tools you can use for 3D modeling, ranging from beginner-level software (e.g. TinkerCAD) to professional ones (Shapr3D, Fusion360, Rhino3D). There’s usually quite a price range difference between these as well. We chose Shapr3D, because it runs on a freemium model, allowing for a medium quality STL file export for 3D printing, free of charge. And it also has one of the best sketching tools on the market right now. The flip side that currently it only works on iPad Pro with Apple Pencil.
Create your workspace
Creating a workspace will help you keep your sketches clean and transparent, while it gives you guidelines on how to work precisely. This is not an essential step in the design process, but creating the workspace makes modeling much easier.
1. Select the view
Selecting the proper view is extremely important. You can go to a plain by either double tapping or by opening the View menu in the top right corner and selecting the Top Camera. The later solution is the better one, as it will put the origo (the point of origin, i.e. the coordinates 0,0,0 of the X,Y and Z axes in the Cartesian coordinate system) in the middle, giving you a pleasant and transparent workspace.
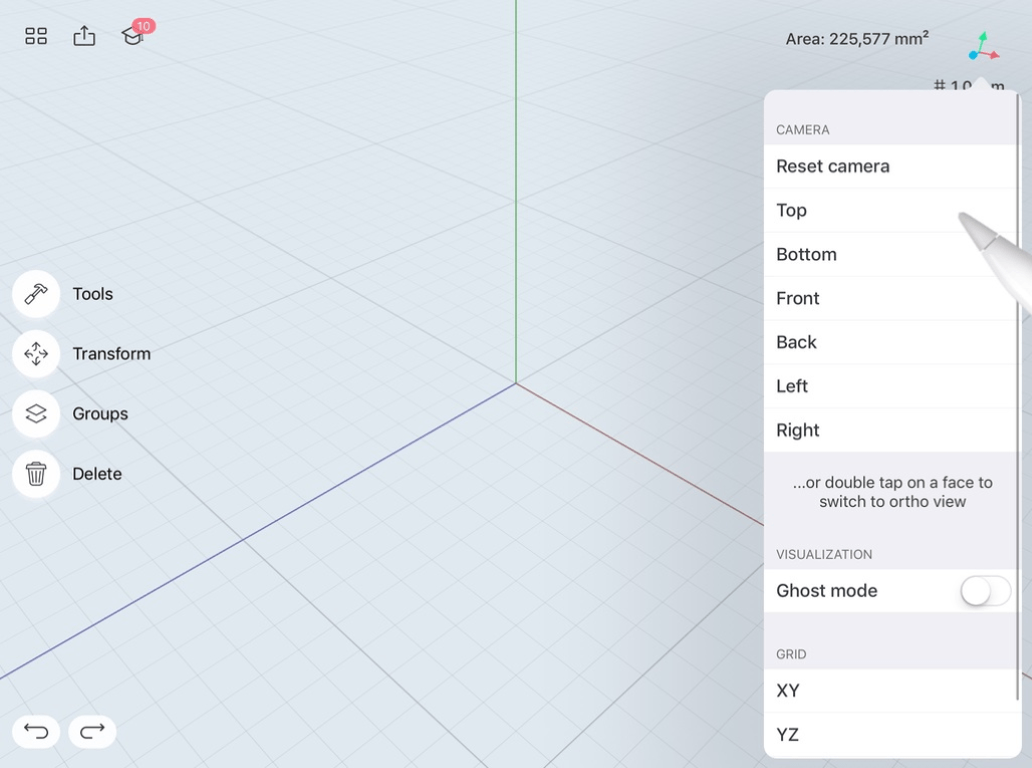
View selection © Shapr3D
2. Select millimeters as units
The bookmark is measured in millimeters, so we should go ahead and make sure our sketch has this unit setting as well. You can reach the Units Settings by clicking on the „hamburger icon“ at the bottom right corner. Select Millimeters.
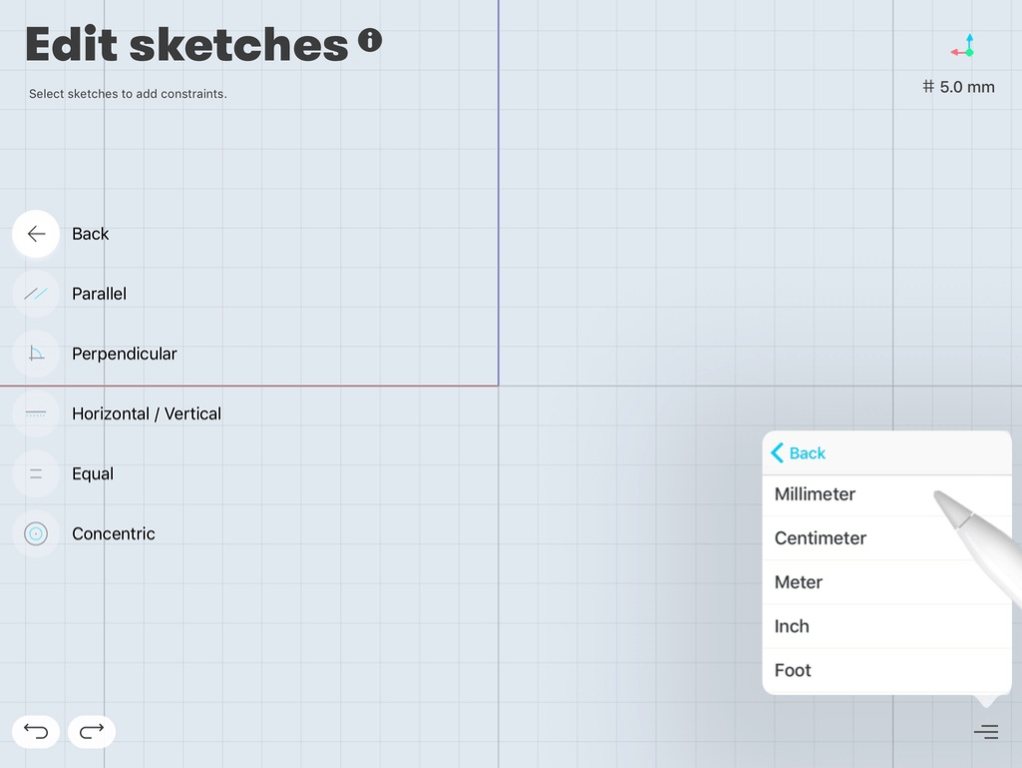
Selecting units © Shapr3d
3. Create a 50×50 mm square
Creating the 50×50 workspace is an easy practice before we get into the more serious modeling. Draw a 25mm line on the blue axis (X), then draw a 25 mm line perpendicular to it. This will give you your first corner and help you center the square at the origo. Now you only have to draw four 50 mm long perpendicular lines to create the square. Once you are done, you can delete the two, 25 mm guidelines and lock the square with the Lock icon in the Constraint menu.
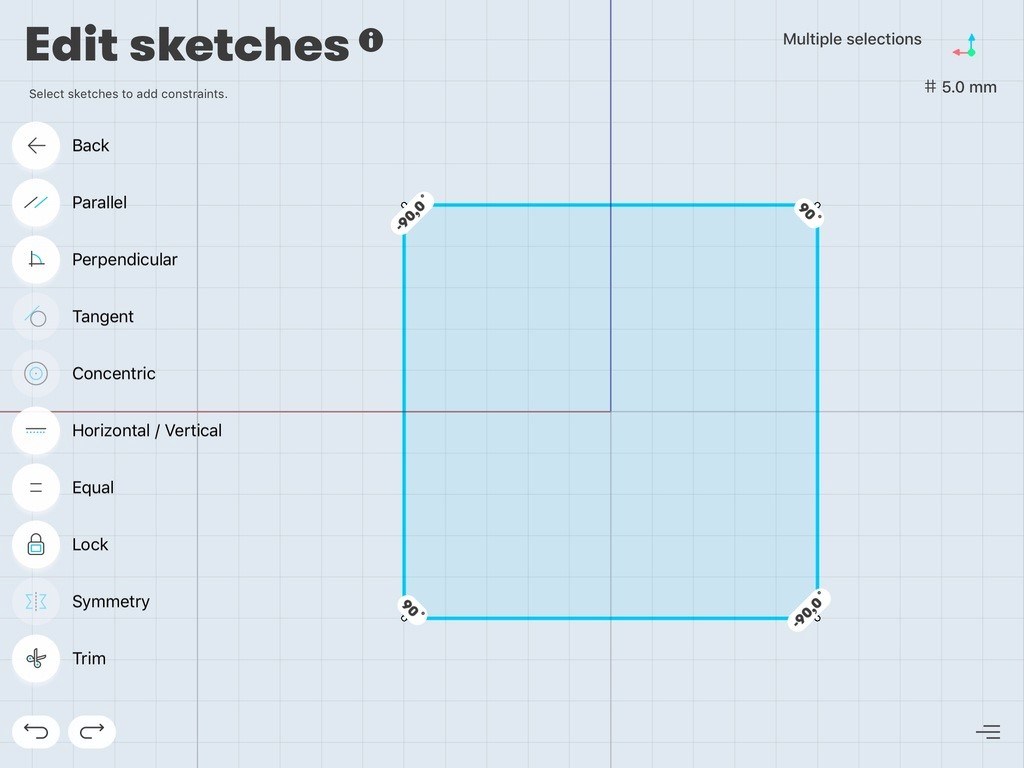
Creating a workspace © Shapr3D
Creating the hearts
1. Create the arc, starting 15mm from the origo
Create a 15 mm long guideline starting from the origo. Lock this point and start creating the arc from the fixed point. You can create an arc easily by making an arc-like movement with your pencil. You can switch between drawing a straight line and an arc/circle by wiggling (shaking) your pencil while keeping contact with the pencil and the iPad Pro (see pic below).
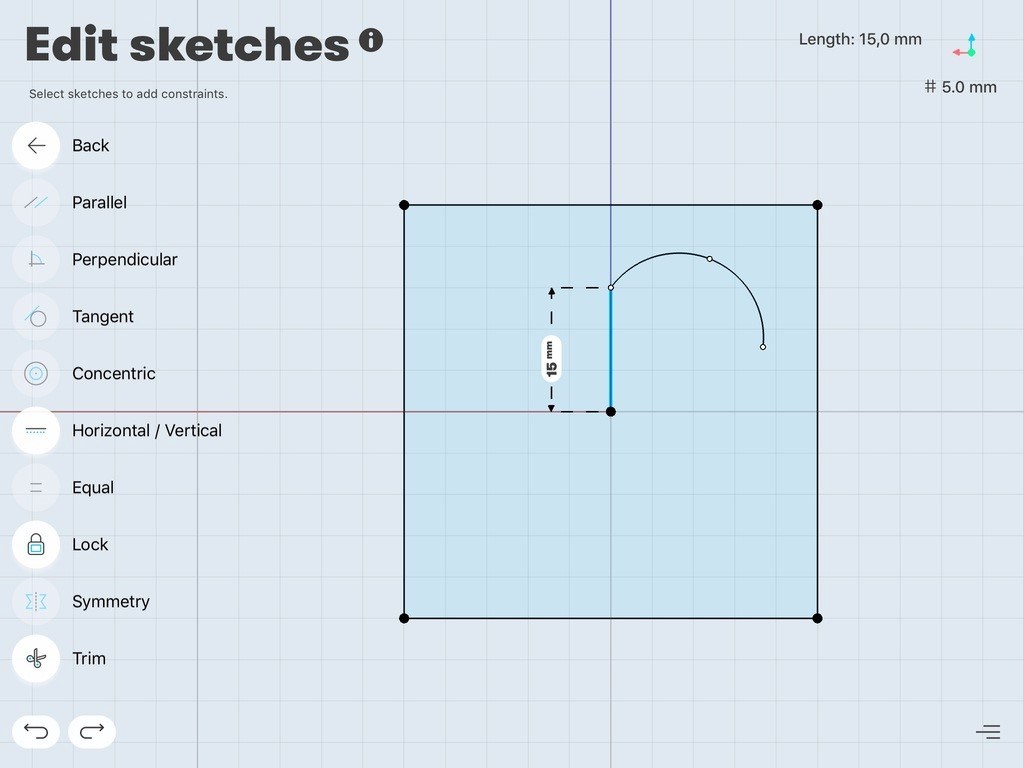
Creating the arc © Shapr3D
2. Specify the arc: control points and radius
Since we have the precise parameters, we should start using them. Click on the arc, and then click on the number showing how long it is. Set this number to 12,5 mm – this will automatically give it a Length Constraint.
Constraints are geometric rules that tell sketch geometry how to behave (parallel, perpendicular, horizontal, vertical, equal, concentric, etc). These constraints can be added and modified later. You can also set a constraint to length, angle or diameter.) In this case, the length constraint will give a specific value to the length of the arc (12.5 mm). So even if we modify other parts of the sketch, it will keep this value. If we don’t need a constraint anymore, we can easily delete it, by clicking on the number and unlocking them.
You will see 3 points on the arc, two endpoints and a control point. We now know where the first endpoint is, and we will deal with the second one later. But we have to find a proper place for the control point. It is located 5 mm to the left and 3mm down from the upper right corner. You can measure the exact location (as you can see on the picture I chose this way) or you can use the grid, the results will be the same. When you’ve found the location just drag the control point there and lock it.

Setting control points and radius © Shapr3D
3. Creating the endpoint of the arc, the line and making them tangent
Now we have to find the second endpoint’s place. It will be defined by the line that is tangent to it, so let’s create a that line first. Draw a line from the end arc point, and snap it to the bottom edge of our square. This will create a Coincidence Constraint, the line will stick to the chosen edge.
When selecting both the arc and the created line, you will see a degree number popping up. Modify it to 180 degrees, and drag the free end of the line to the middle point of the bottom edge (either by using the grid or measuring it: 25 mm from either of the bottom corners).
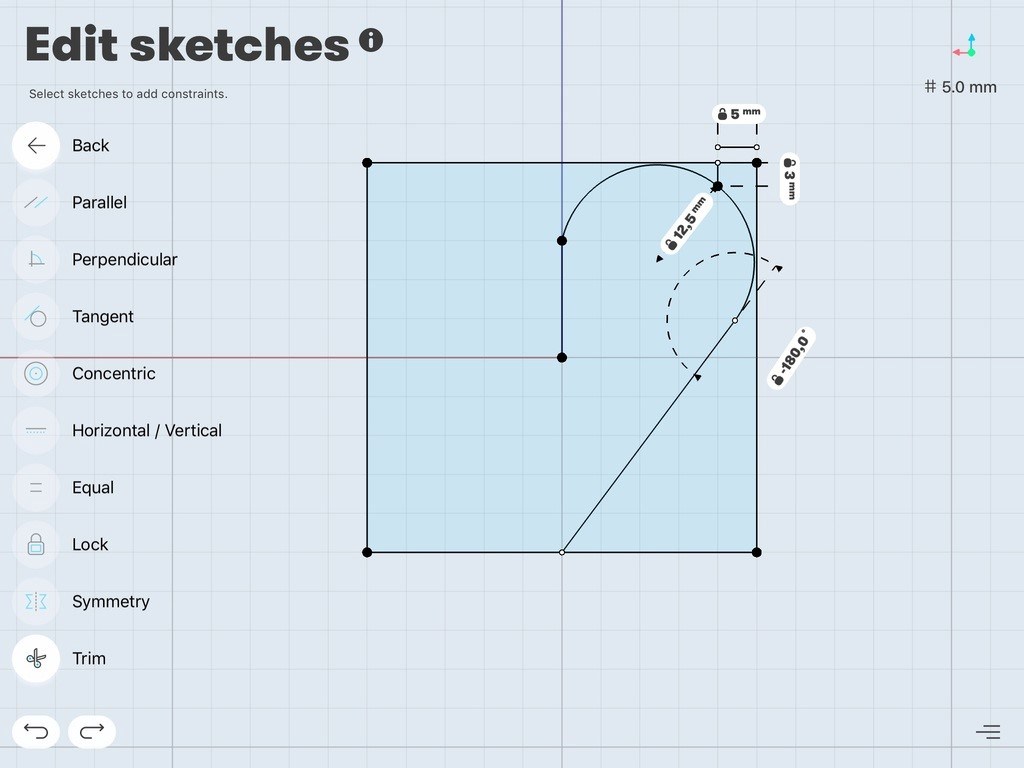
Setting endpoints and line © Shapr3D
4. Repeat this on the other side
You just have to repeat the 3 steps mentioned above on the other side of the square. Make sure the two parts are sharing the two points in the middle.
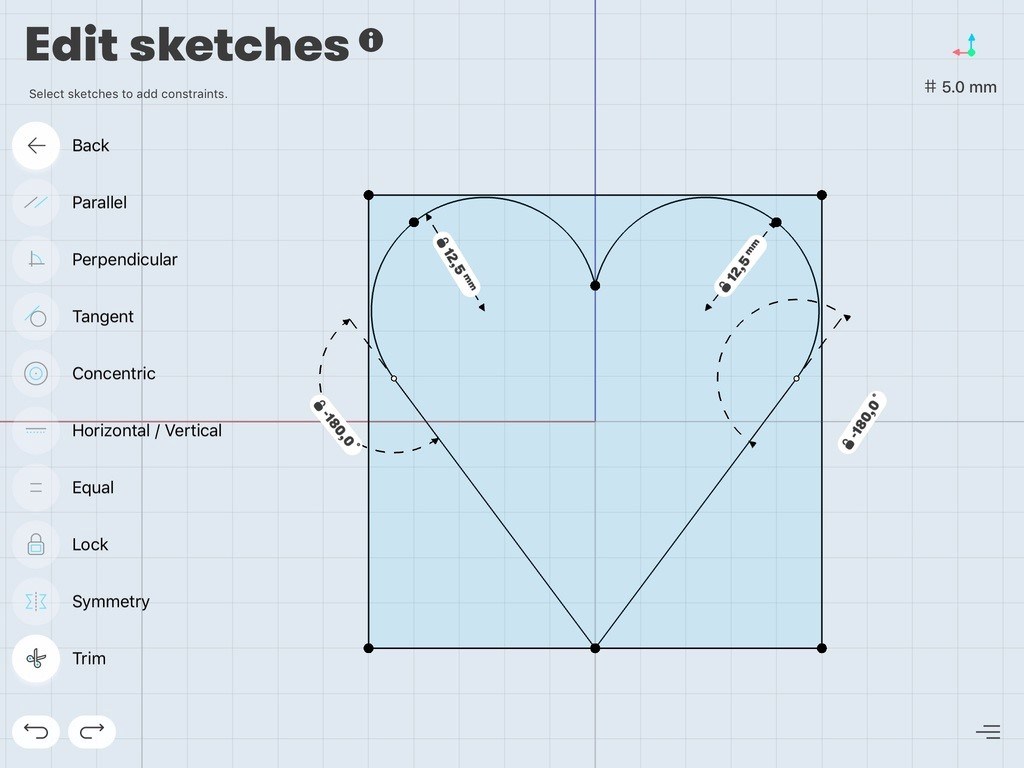
Creating the heart shape © Shapr3D
Alternative techniques
If you feel comfortable with 3D modeling you can try the following, a bit more advanced technics, which will be much easier to use in the long run. If you click on Transform you’ll see 4 different options that helps you move, rotate, scale your objects. We are going to use two of these to create the full heart.
Mirror&Copy
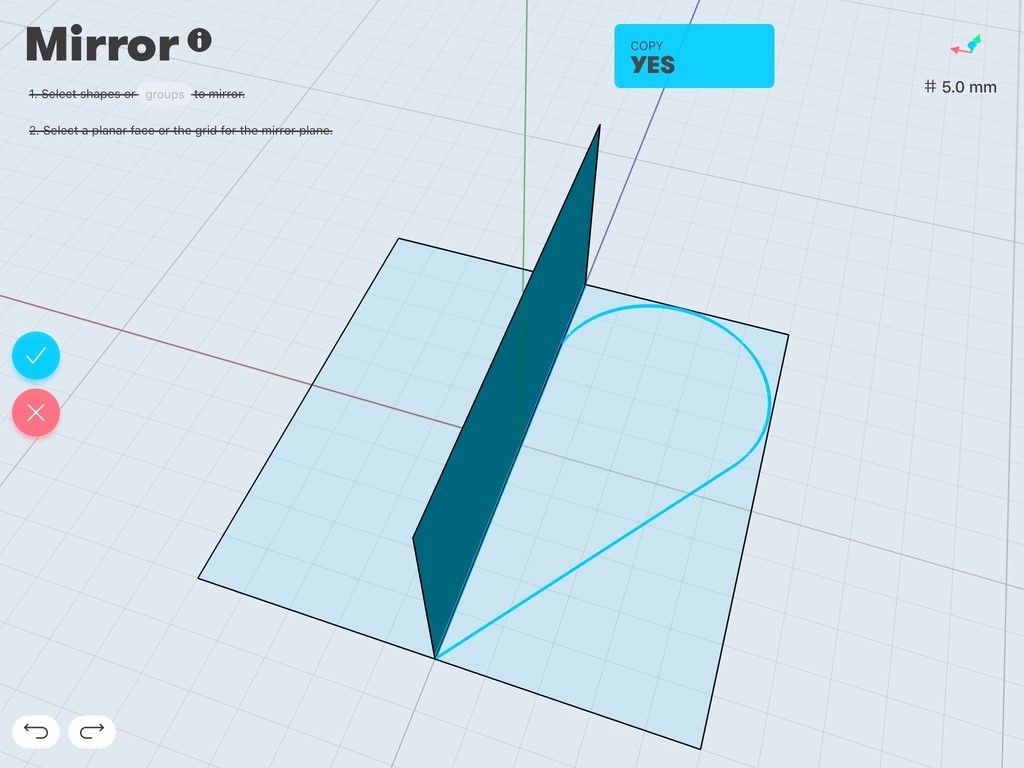
You can mirror 2D and 3D objects as well, but you’ll always need a 3D plain to do this. First create the plain in the middle section by connecting the middle points of the two horizontal edges. Then click on the line and extrude it, by dragging it upwards. Click on the Mirror tool, select your object, select your plain, click Copy Yes and then the OK button.
Rotate&Copy
Rotating is even less time consuming. You only need an axis, rather than a plain. Click on the Rotate tool. Select your object, select the axis of rotation, Copy YES and lastly the angle of rotation (180 degrees)

5. Making the heart curve into a heart surface, with the offset tool
You can easily turn these curves into the desired surface by offsetting them. Find the Offset tool in the Tool Menu, select it, and then follow the instructions on the screen. First select the curve to offset, and then select the rate of the offset. It should be 1,5. It will create a slightly smaller heart (1,5 points smaller) than the original one. This will be the thickness of the outside heart eventually.
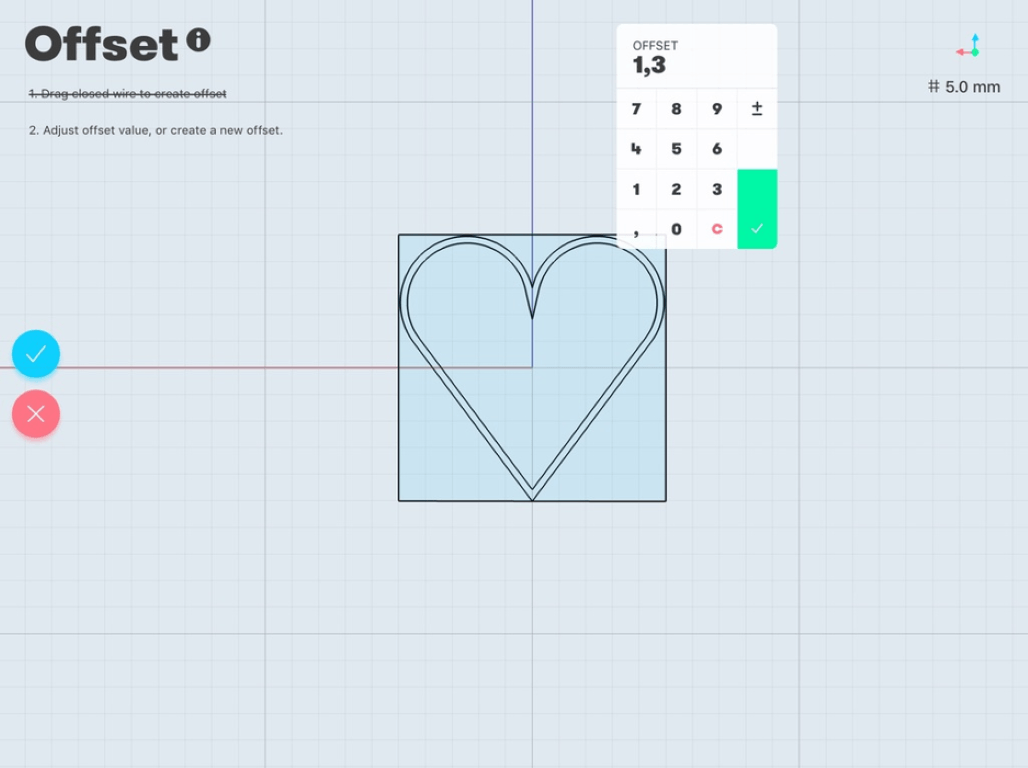
Offset function © Shapr3D
6. Copying and scaling the heart
We have to create the smaller heart in the middle as well. Since the two hearts look the same, we can easily copy and scale down our originally created heart. For this, go to Transform/Freeform, then select all the curves. Tap on Copy/Yes and by moving your Pencil scale it to a 0,8 rate version of the heart. This will make a smaller copy of our heart.
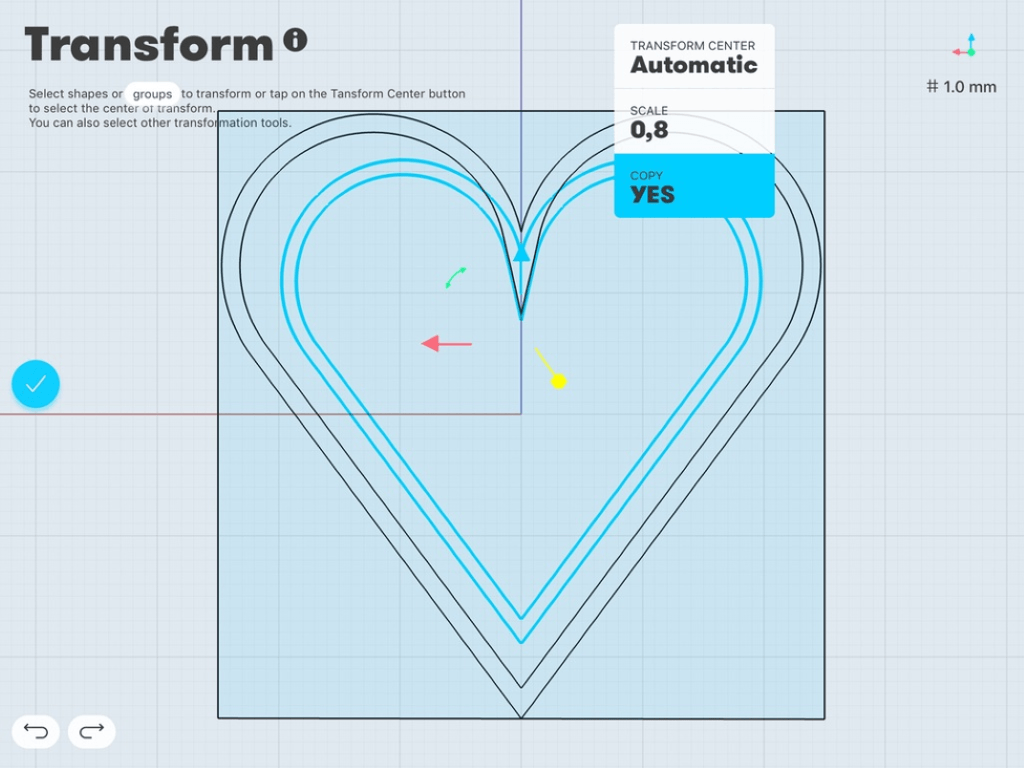
Transform function © Shapr3D
7. Adjusting the two hearts to each other
You will notice that our hearts are not perfectly adjusted to each other. You can fine tune the intersections by moving the control points and snapping them together, as you can see it in the picture.

Fine-tuning intersections © Shapr3D
8. Transforming the sketch into a 3D model with the extrude tool
Our last step is to extrude our surfaces. Select all 3 surfaces (outside and inside heart and the intersection), and extrude them by dragging them upwards. The height of the shape I chose was 3 mm, as this suited my needs. The final height is actually up to you, but choose it high enough, so that it does not break too easily.
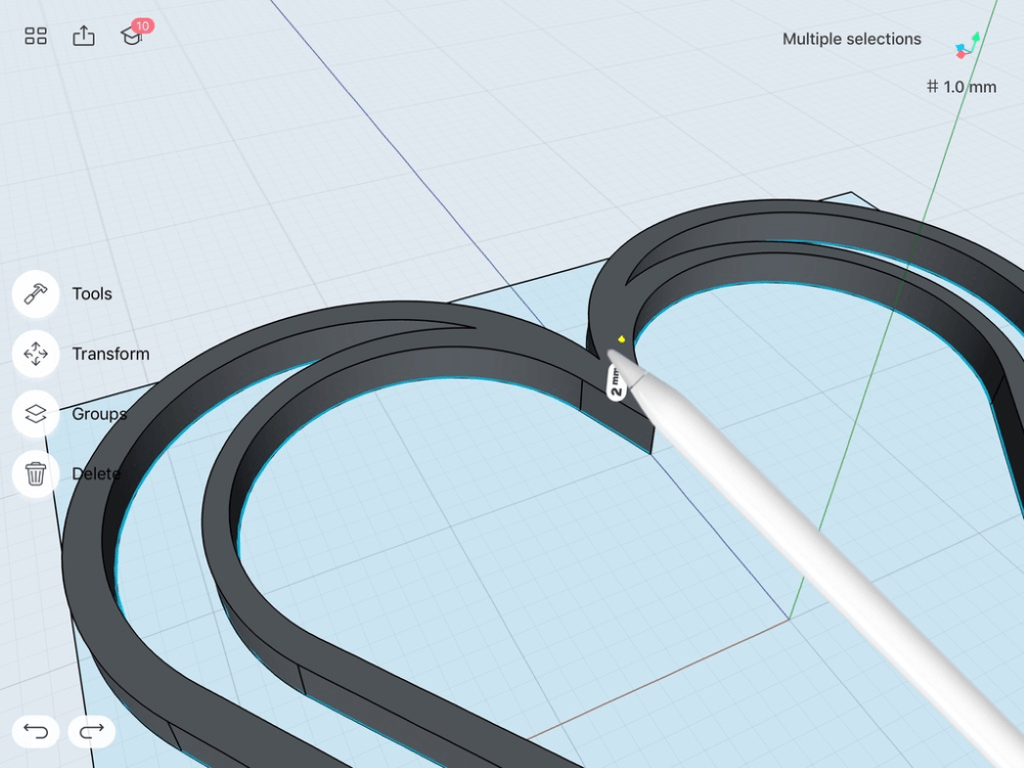
Extrude tool © Shapr3D
Conclusion
We created the 2D sketch first and made a 3D version out of it with the extrude command. If we want to modify how the heart looks or how well the arc is bent, then we usually modify the initial sketch first, and then recreate the 3D version out of that. Modifying something in 2D first and turning it into 3D is usually much easier to do, so that’s why the quality of your sketch matters a lot.
C. Slicing the bookmark
Now that our 3D design is ready, we can finally start the printing process. We are using an additive printing method (layer-by-layer printing), so there is still a small step left before the actual printing. It is called slicing. Slicing is the process of transforming your 3D model (most likely from a .stl format) into a machine code (g-code), that your 3D printer can understand. A slicing program slices up your object into layers, so the machine knows exactly, where to start printing, and where to end it.
We used the Craftbot’s own, free slicing software called Craftware. It does the job for beginners and advanced users as well. There are many other slicer options. If you’re not satisfied with Craftware, you can have a look at the slicer list on 3dprintingforbeginners.com. We downloaded the .stl file from Shapr3D, and opened it in Craftware.
Craftware immediately showed us our object, and with one click the different options for slicing appears. First it will give you the Easy mode, but you have to switch to the Expert mode.
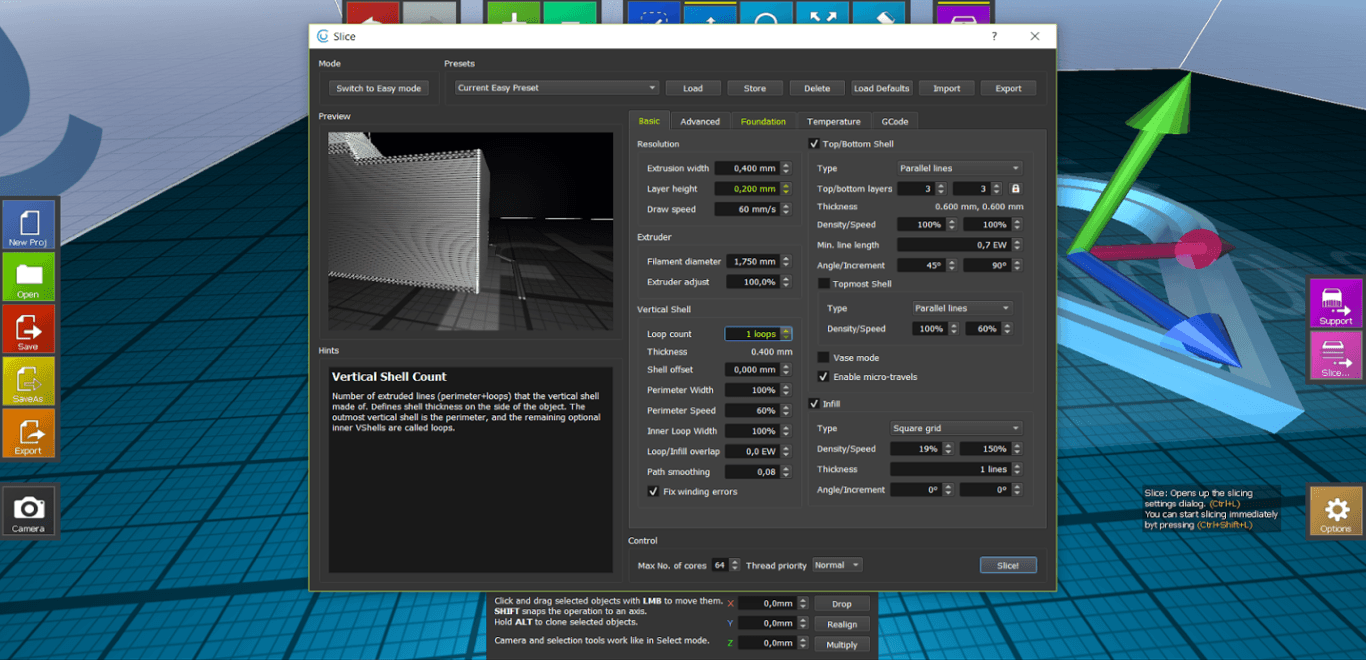
text © text
We want to set the loop count to 1 (the system originally makes this 2 loops). We do this, because the inner circle is so narrow, that if there were two loops there would be a gap between the loops it creates. See for yourself:
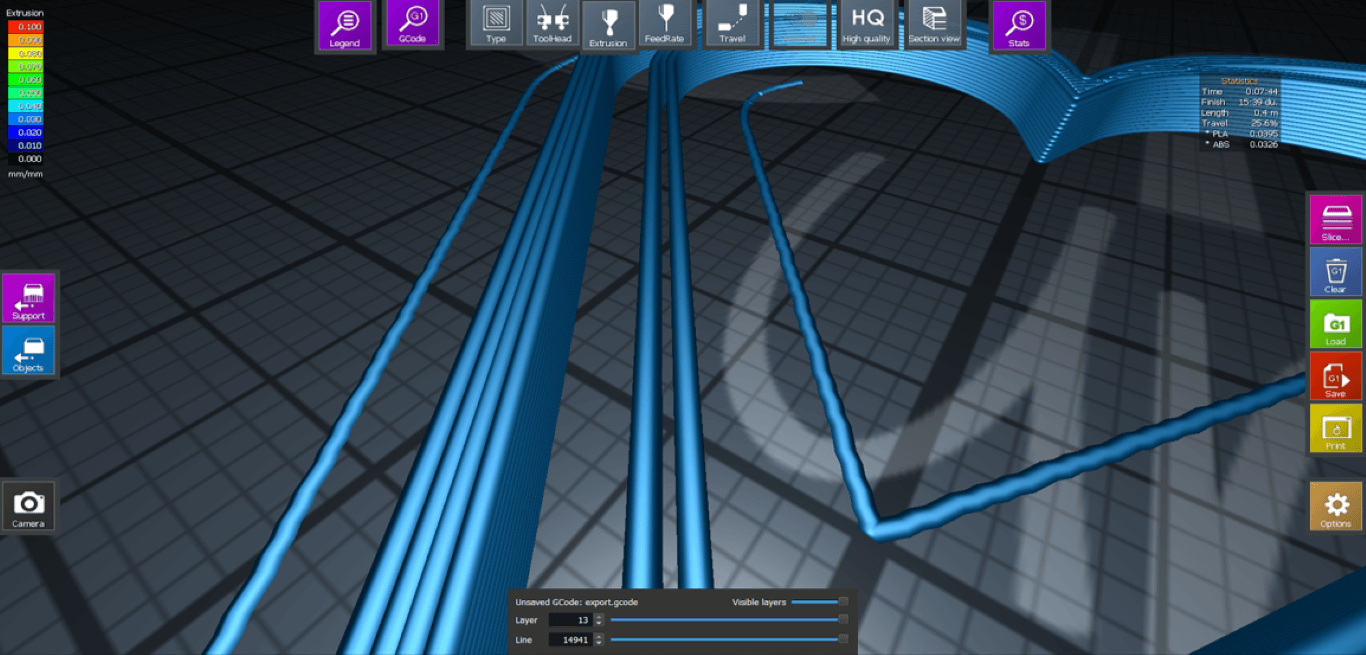
With two loops © Shapr3D
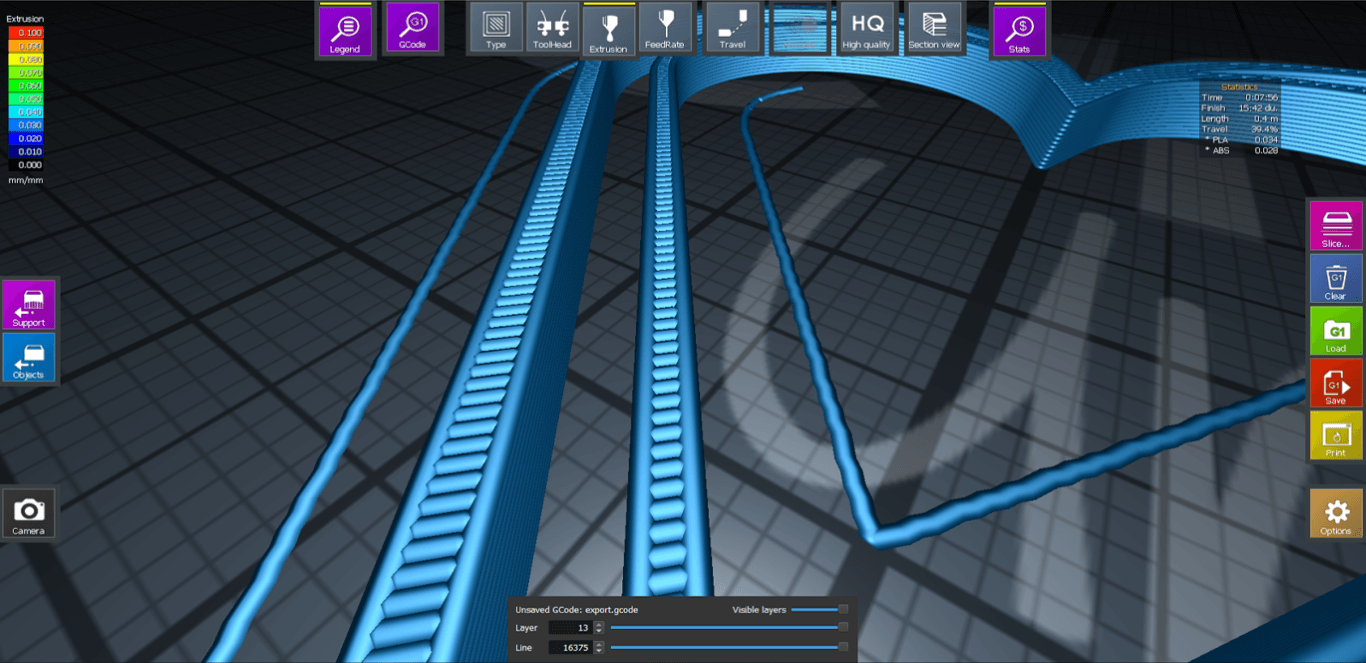
Single loop © Shapr3D
When we finalize the slicing, we should have an object that looks like this. Notice the layers, this is how the printer will print our model, layer-by-layer.

Layers of the model © Shapr3D
The software will also give some small statistical analysis, so you know what to expect timing and money-wise (filament usage – length). It will also estimate the percentage of travel during the printing process, which tells you how much your extrude nozzle will go without actually printing something. During these periods filament can spill out of the nozzle and create an unwanted web. Adjust the nozzle’s speed during non-printing movements to avoid this problem.
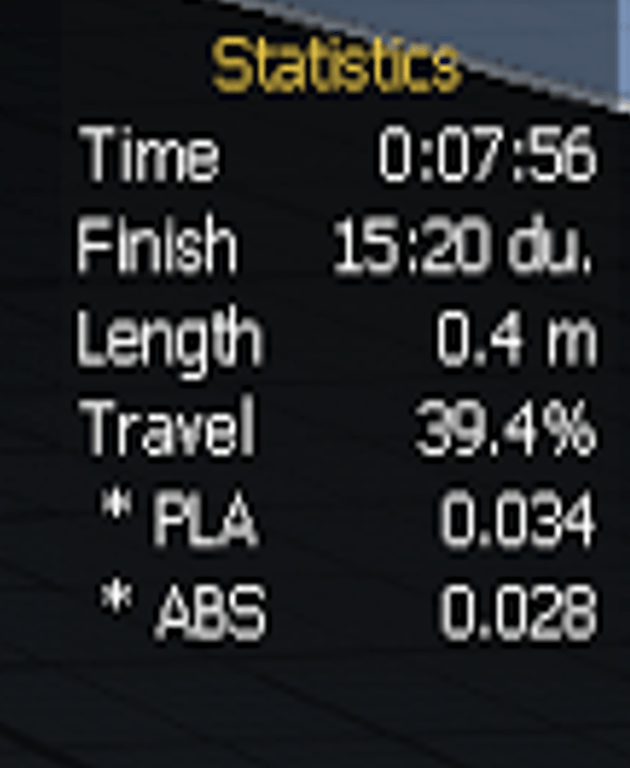
D. Printing the bookmark
Before explaining the printing process we would like to give you more information on why we chose a Craftbot 3D printer, i.e. an FDM-type (Fused Deposition Modeling) 3D printer. The machine melts the filament (usually plastic), and through the extrusion nozzle builds the object layer-by-layer, while the build platform constantly moves downwards. It is the simplest method of 3D printing, as it doesnt really require a lot of post-processing. A big disadvantage of FDM is that sometimes the still modifiable, melted material easily collapses under the weight of subsequent layers. It is also not able to print with very fine details.
The technology people usually compare FDM with is the SLA technology. This technology works differently as the object is elevated from a the melted resin bath,while it is being cured (hardened) by a focused UV light. This method results in a far better quality in terms of the fine details, but there are three big disadvantages of this technology: (a) it requires a lot of post-processing after printing (after removing it from the printer, you have to treat it in a isopropyl bath to remove the sticky outside of your object, caused by the printing process) , (b) the process is usually slower and (c) the resins are usually a lot more expensive than FDM printer filaments.
We chose FDM printing in the end, because our object was small (only 13 layers) and not much detailing was needed. If we were to print a complex shape, we would have used an SLA printer.
Our friends from the FabLabBudapest were helping us with the printing by lending us one of their Craftbots. We were done with it pretty fast and easy.
Some numbers from the print
- Filament heat up time: 15-20 minutes
- Printing time: 8 minutes
- Used filament: 0.4 meters
- Cost: 2$
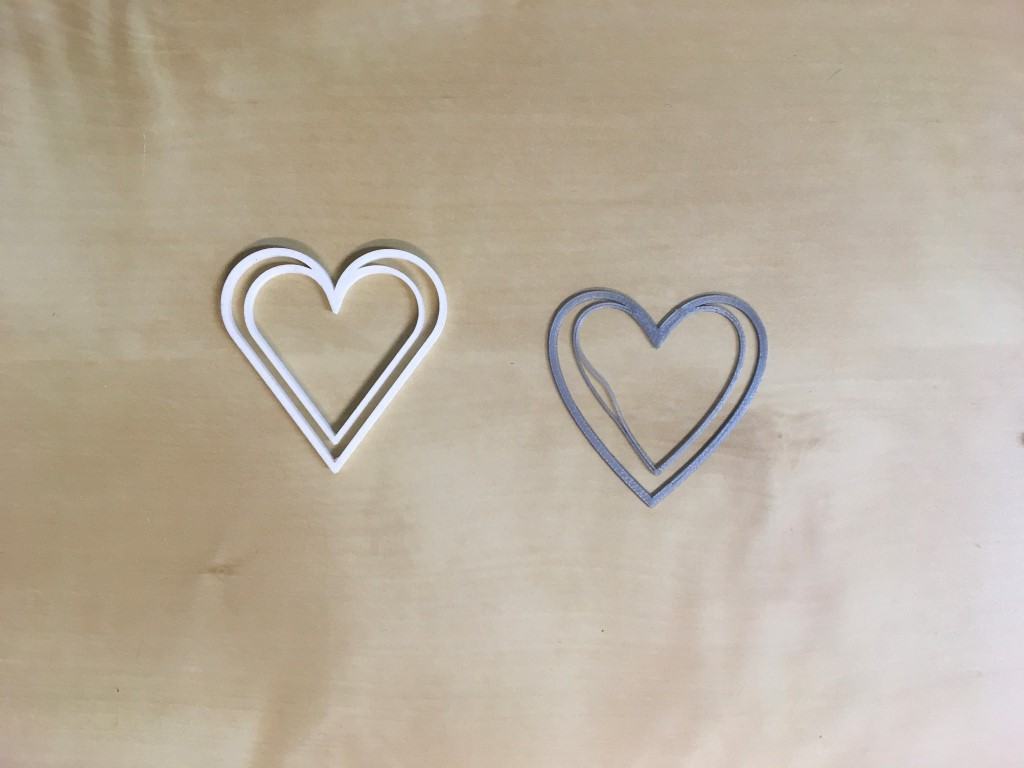
Heart-shaped bookmarks iterations © Shapr3D
Here is our end result. As you can see from the photo above (the gray heart), our first try was far from perfect. Actually, there were a lot of mistakes in it and the first print only took a couple of days of usage before the inner heart broke. So we made a few adjustments and the model came out fine. Have a look at the photos below to see how your heart-shaped bookmark can look in the book of your special someone.
– Swipe left/right to see more
So, there you have it: an easy way to learn how to create your first model in a CAD software. If you wish to see in detail the functions that Daniel used, please have a look at our 5 minute video of this step-by-step guide.
E. Free download of the .STL file
And if you don’t feel like doing this whole tutorial or lack the necessary tools, don’t worry. The guys at Shapr3D graciously put the STL file of the heart-shaped bookmark at our disposal, so that you can download it for free! You can print it or even modify it to suit your needs.
[EDIT: we are currently having some troube with the download feature and are looking to get this fixed as soon as possible]
What do you think of this tutorial? Did you design the heart-shaped bookmark? And did you offer it as a Valentine’s gift? Please take a moment and share your experiences and feedback by commenting below.
Website: LINK
Schreibe einen Kommentar
Du musst angemeldet sein, um einen Kommentar abzugeben.