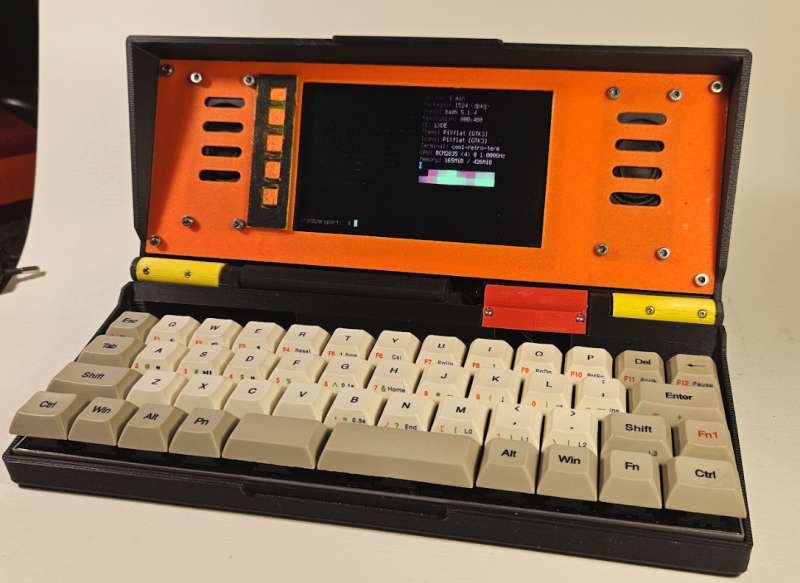
This little device includes a mechanical keyboard that, Michael says: was his primary motivation for making his retro marvel. Having first cut his teeth learning BASIC on a Sharp PC-1260, he quickly became a fan of portable computers and snapped up many more. But when, in recent years, he sought to revive his interest in such machines, he said he’s been left disappointed.
“I have tried Raspberry Pi and Linux-compatible portables and laptops but I’ve never been really satisfied with their keyboards,” he says, name-checking the Pocket C.H.I.P, Devterm and uConsole projects. “Even at work I used a mechanical keyboard with the company laptop so I started to search for smaller keyboards and portable Raspberry Pi projects. I then found ZeroWriter.”
Key to success
ZeroWriter is an open e-ink typewriter with a Raspberry Pi Zero 2 W board at its heart. Michael decided to create one for himself, and ordered the Vortex Core 40% keyboard while swapping out the WaveShare 4.2-inch e-paper display with a Waveshare five-inch monitor. “As there was still space, I added a speaker to the side,” he adds. “But the project was limited in terms of the Python audio effects development I wanted to pursue.”
Michael decided to take the project to another level, hence the use of Raspberry Pi 4. “With the experience of my first build, it was clear that I should go bigger and I also searched for another keyboard,” he says. Looking on pcbway.com, he found the Happy Keyboard, a 47-key, 40% ortholinear mechanical keyboard that uses a Raspberry Pi Pico development board running KMK firmware. It formed the basis of the design for the entire project.
“I started with the keyboard because it was the single largest part of the build,” he explains, adding that the next step was to find a display. “I searched for a screen with vertical resolution bigger than 400 or 480, and found a 9.3-inch display by Waveshare with a funky resolution of 1600×600 which fitted perfectly to the 40% keyboard.” This setup dictated the design of the project’s case, and it helped that every Waveshare screen comes with a CAD file and audio amplifier.
“It was all natural and fell into place because of the size of the components and the requirement that the keyboard should be as low as possible,” Michael says. “Somehow I loved the wide display more than a normal 16:9 display, so this may be the reason for the centred screen.”
A great case
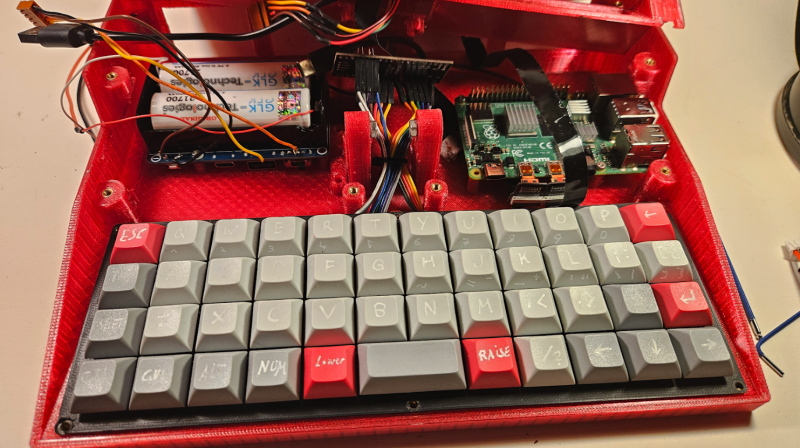
Other design considerations needed to be considered. “It was clear in the beginning that the Raspberry Pi 4 and the battery would have to sit behind the keyboard,” Michael says, having decided to place them in a sizable rear compartment. The Raspberry Pi Pico development board also needed to be moved because there wasn’t sufficient room on the main keyboard PCB.
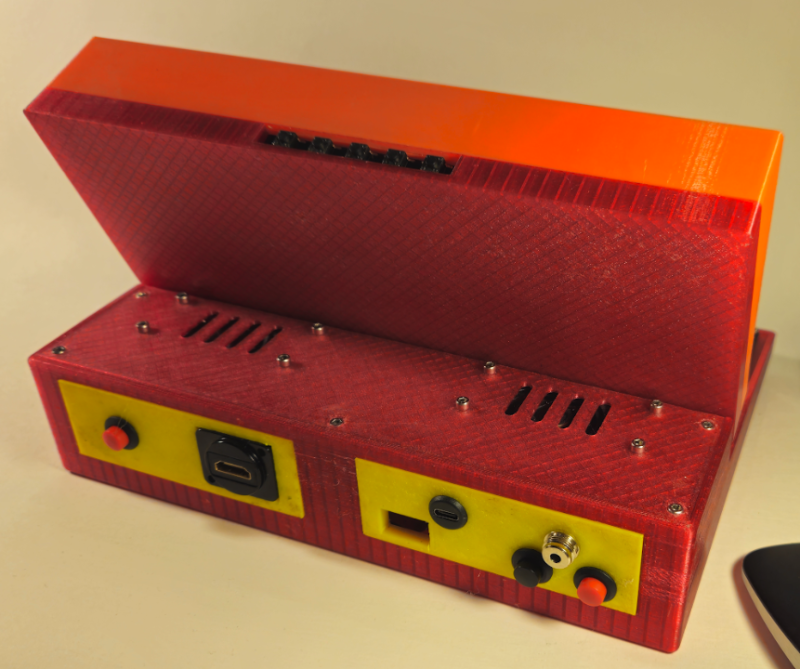
In extending the back section by up to two centimetres and increasing its height to match that of the screen and keyboard, Michael found space to fit audio speakers. He worked on ways of being able to use the USB ports, too, by creating insert panels on the back of the case for flexibility. “Instead of having to print an entire case, taking tens of hours, every time I decided I’d want to reconfigure the ports, I could just print new panels, which takes about an hour,” he explains.
Even so, there were other issues to contend with. Michael had trouble with the HDMI connection being on top of the screen. “I had to rotate it, and it took me some time to figure out how to flip the screen,” he says. “The display’s on-screen menu is still the wrong way around and this can’t be fixed, but I think that’s a Waveshare issue.”
The biggest headache, however, was power – the system draws juice from a pair of 21700 batteries connected to a UPS HAT. “I tried several battery boards but I was getting random reboots and other issues,” he says. “I then recognised that the cables I used to connect to the Raspberry Pi 4 computer were too thin. After I used better cables it worked fine. There were still some power warnings after two hours but it’s not bad.”
Powering up
Battery issues are why he decided against using a Raspberry Pi 5 board, for now at least. “If I could find a battery able to power it, I’d use Raspberry Pi 5,” he says. Michael also wants to be able to move the Raspberry Pi computer away from the side and make a side panel. “This would make it possible to use more single-board computers in the future, and help to connect the screen and keyboard to Raspberry Pi internally,” he says.
But he’s more than happy with the result so far and he says it’s a build that has fulfilled his requirements. “It’s also been a good way to learn FreeCAD which was fun most of the time – there was a lot of cursing before understanding, though.” He uses the device for programming and watching streams and finds it to be very convenient. “It’s easy to fetch and can be placed on the couch or kitchen table without taking up much room,” he says. And that, in a nutshell, is what a portable computer should be like.


