Nevertheless, many have concerns about subscription costs and privacy of the data
collected. The good news is that many open-source Raspberry Pi automation systems
have matured significantly over the past few years. They now challenge the big players,
are free of charge, and put your privacy first. Over the next three issues we’re going to set
up a smart home from scratch.
Step 01: Your new Home Assistant
To make our home a more fun place to be, we’re going to set up a home automation
system. This is software that can communicate with multiple devices and make changes to
your environment based on a rule set. Sounds a bit complicated, but the ‘HA’ scene has
got a lot friendly over the past few years. We’ve chosen the appropriately named ‘Home
Assistant’ (home-assistant.io) because it is a complete operating system package and
runs well on Raspberry Pi 3 or above. Best of all, it has incredible support for hundreds of
smart devices.
Step 02: Installation and first boot
Home Assistant is available as a full microSD card image – no operating system installation is required in advance. To get the image, go to magpi.cc/homeassistantio. Make sure you pick the right one because different images are available for Raspberry Pi
3 and 4. Once downloaded, burn the images to a microSD card using Raspberry Pi Imager
(magpi.cc/imager). We strongly recommend using a wired Ethernet connection for
reliability. Whichever you choose, use a wired connection when booting up for the first
time. Be patient, Home Assistant will take up to 20 minutes to start up on first boot.
Step 03: Terminology
Before going any further, it’s useful to understand the terms used in Home Assistant.
Take a look at the ‘Home Assistant terms’ box and understand Integrations, Devices,
Entities, and Areas. Take some time to become familiar with the terms while Home Assistant is setting up.
Step 04: First connection
After 20 minutes (don’t worry, it’s a one-time thing), you should be able to see a welcome
screen. Open a web browser and visit: http://homeassistant.local:8123/. If not, try using a network utility like Fing for iOS or Android to locate the IP address of the
server and try that instead. If you still can’t get a connection, try waiting a little longer.
Eventually, you should see a ‘Preparing Home Assistant’ screen. This will shortly change
to an account creation screen. Home Assistant has full support for multiple accounts with different permission levels. The
account you create here will have full control over the system.
Step 05: Initial settings
Once you’ve completed the form and created your first account, you will be asked to select
your location and give it a name. This information never leaves your network and is used
to get information on sunrise and sunset times for where you are. You can also choose
your preferred unit of measurement. These details can be changed at any time. You’ll now be taken to the Overview dashboard, the heart of the system. A dashboard is a collection of panels that display various bits of information and allow you to control your environment. Your system is already up and running.
Step 06: Your first dashboard
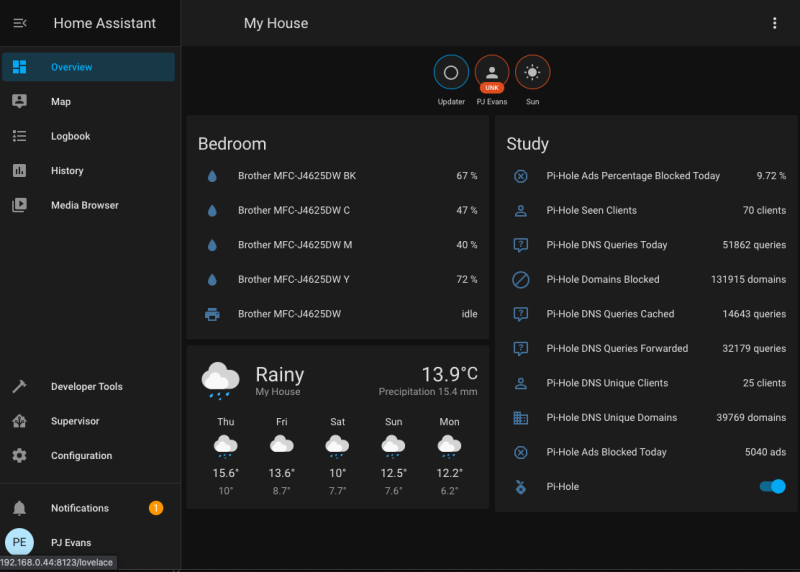
The Overview dashboard has been populated with some initial panels. Largest is the
weather panel, based on your location. You will also see ‘badges’ at the top. Try clicking
on the Sun badge for data about today’s sunrise and sunset. There will also be a person
badge which will probably say UNK for ‘unknown’. We’ll come to that later. For now,
explore the left-hand menu. You can see a map (this will get more useful), a log of all
events, and several configuration options. You’ll also see Notifications – the chances are,
you’ll have one waiting. If you do, Home Assistant has discovered things on your network
that it can talk to.
Step 07: Your first integration
Did you click that notification in Step 5? If so, you’ve probably been informed that Home
Assistant has already found some devices on your network. It can be surprising how chatty
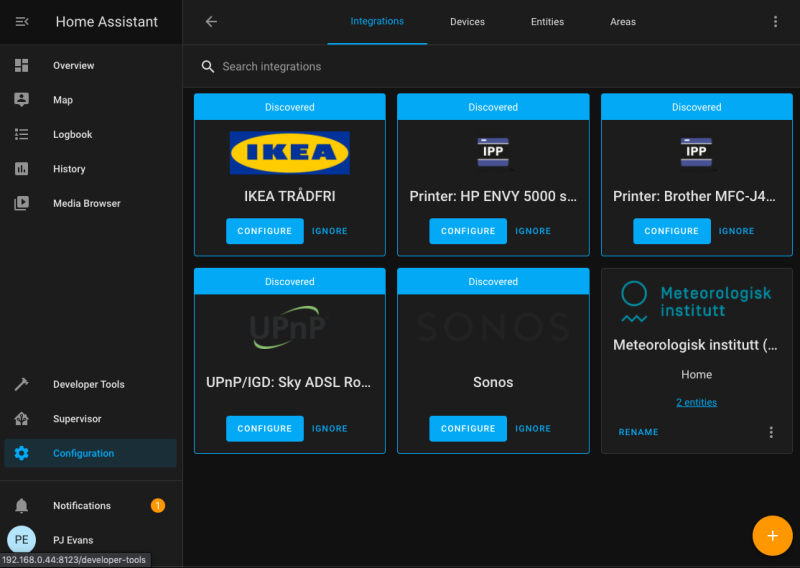
some things can be. Printers, routers, and media systems such as Sonos will all happily
introduce themselves to Home Assistant. To actually start using the integrations, click on Configuration then Integrations. Now click Configure on your choice of integration. Some additional information may be required, but often auto-discovered integrations work out-of-the-box. If a particular integration is not of interest to you, click Ignore to hide it.
Step 08: Automatic dashboards
Once you’ve enabled and configured some integrations, go back and have a look at the
Overview dashboard. Home Assistant will have automatically added an appropriate panel
to show data or add controls. If you have a Philips Hue or Ikea Trådfri gateway, your lights
will have been discovered and added to the panel. This feature makes getting started with Home Assistant a breeze. If you’re happy with this, you can let Home Assistant update and configure your panel as you add new integrations and devices. However, if you want full control, you can disable this feature and create your own panels.
Step 09: Your own dashboard
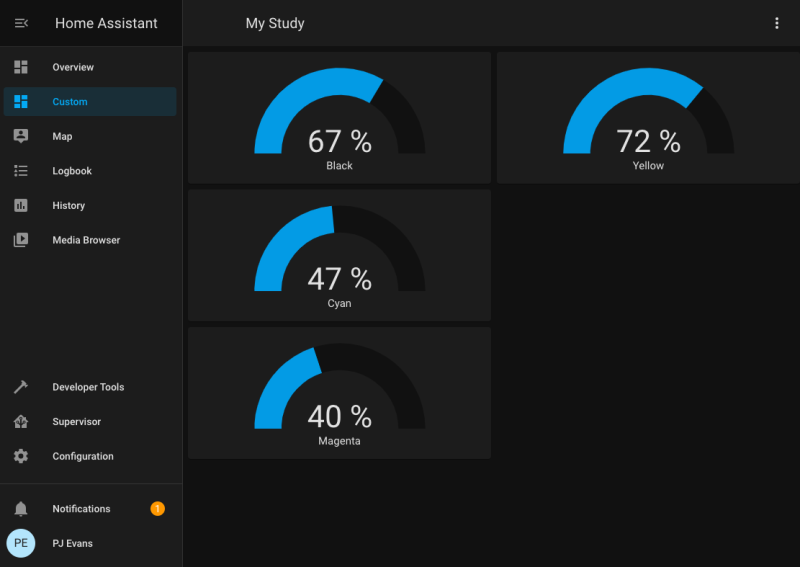
When we installed our Home Assistant, it found our networked printer and created a panel
that showed the ink levels for each cartridge. It’s a bit dull, so let’s make a better one. By
clicking on the three dots at the top-right of the screen, we can Configure the UI. You’ll see
a warning that automatic configuration will be disabled. You can now edit, move, delete,
and add new panels. You can also add tabs across the top and you can have as many
dashboards as you like. We created a new tab for our printer.
Step 10: Adding panels
We now have a nice, clean area to work with. Click the + icon at the bottom-right to add new panels. You will see all the default panels available, covering many different use
cases. These include switches, gauges, playback control for media centres, and many
more. You can even design your own. We clicked the ‘gauge’ panel as that seemed best
for printer ink. Home Assistant is helpful enough to work out what entities are best for the
type of panel and you can control certain aspects such as warning thresholds. We added a
gauge for each of our printer ink cartridges.
Step 11: Adding new integration
We strongly recommend spending some time looking at the available integrations. Click on
Configuration, Integrations, then click the + icon. You will be presented with a bewildering
list of possibilities. We found an integration for pi-hole, the ad-blocking service. After
entering the address of our Raspberry Pi 4 running the service, we had a panel full of stats
to look at. Some integrations increase the capability of Home Assistant to talk to other
devices. For example, the MQTT (Message Queuing Telemetry Transport) integration
allows Home Assistant to subscribe to MQTT topics and trigger events. If you’re handy
with Python, you can create your own custom integrations too.
Step 12: Going mobile
If you’ve set up all your lights to work with Home Assistant, it’s going to be a bit pointless if
you have to run to a computer every time to need to flick a virtual switch. An essential part
of any Home Assistant setup is the smartphone app (iOS or Android). This not only allows
you quick access to your dashboards, but also adds you as an entity.
The app communicates with Home Assistant and provides location and activity information. All your health stats tracked by your phone can be added and your location reported. All this data stays in your network and you can switch it off any time, but there are great possibilities that we’ll look at next month.


