First, you’ll create an assistant that uses a list of rules for understanding commands, and you’ll learn why that approach isn’t very good. Next, you will teach the assistant to recognise commands for different devices by training it using examples of each command.
1. Get started
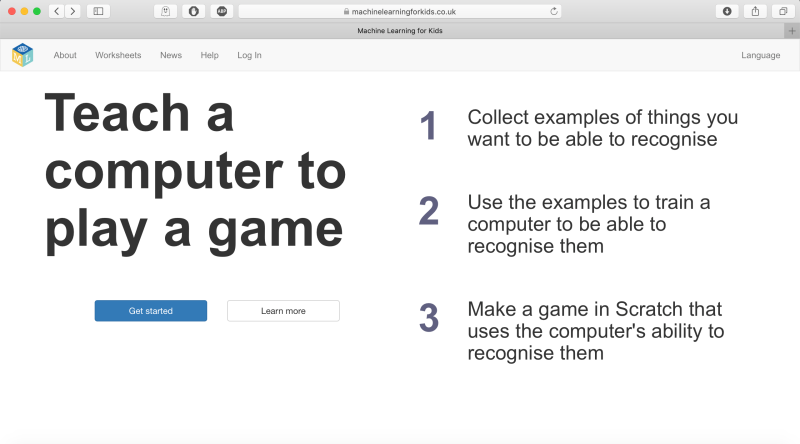
Head to machinelearningforkids.co.uk in a web browser. You’ll then need to click on ‘Get Started’, and then click on ‘Try it now’.
2. Create a project
Click on Projects in the menu bar at the top, and then click on the ‘+ Add a new project’ button. Name your project ‘smart classroom’ and set it to learn to recognise text, then click on Create. You should now see ‘smart classroom’ in the projects list; click on this project.
3. Prepare the project
Now we need to get a project ready in Scratch. Click on Make, click on Scratch 3, then click on ‘Scratch by itself’. The page then warns you that you haven’t done any machine learning yet. Ignore this and click on ‘Scratch by itself’ to launch Scratch. Finally, click on ‘Project templates’ and then click on the ‘Smart Classroom’ template.
4. Add a list of rules
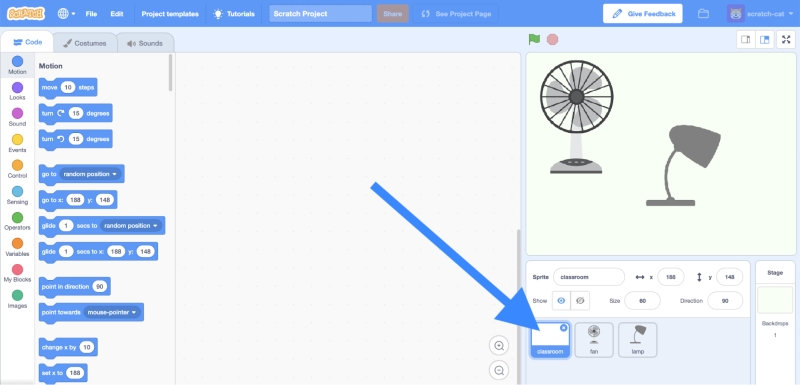
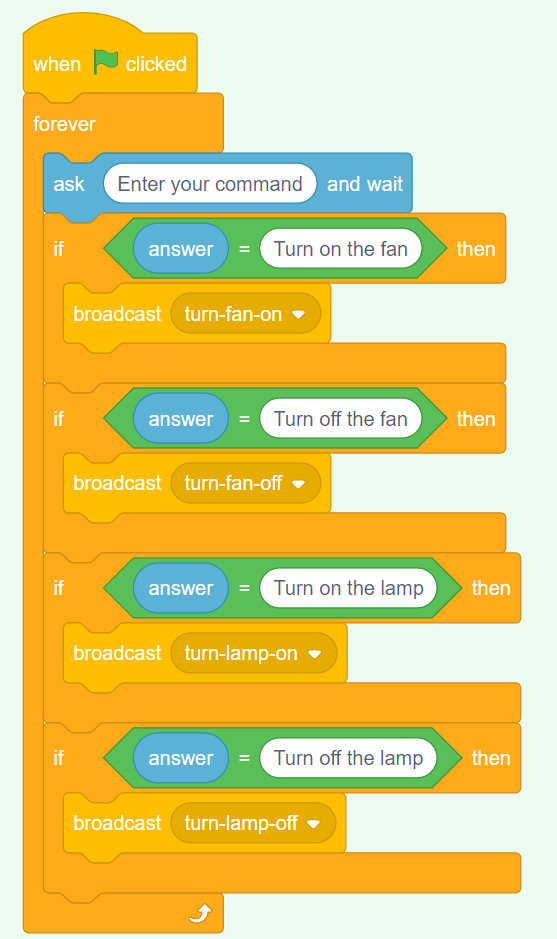
In this step, you will edit the project to include a list of rules to activate and deactivate the fan and the lamp. Click the classroom sprite to select it, as shown in Figure 1. Click on the Code tab and create the script shown in Figure 2. Once you’ve done that, click on File and then on ‘Save to your computer’, and save the program to a file.
5. First tests
Click on the green flag to test your program, and then type in a command and watch the program react! The following commands should all work:
Turn on the lamp
Turn off the lamp
Turn on the fan
Turn off the fan
Type in anything else and your program does nothing! Even if you make a small spelling mistake, the program does not react.
6. Beyond rules
You’re telling your virtual classroom assistant to react to commands using a simple rules-based approach. But if you wanted your program to understand commands that are phrased differently, you would need to add extra ‘if’ blocks.
The problem with this rules-based approach is that you need to exactly predict all the commands the smart classroom assistant will understand. Listing every possible command would take a very, very long time. Next, you will try a better approach: teaching the computer to recognise commands by itself.
7. Examples for training
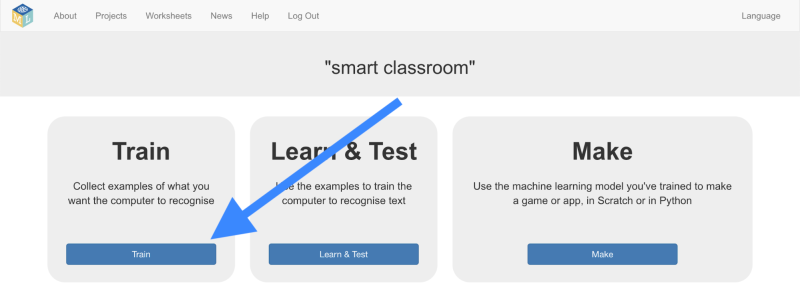
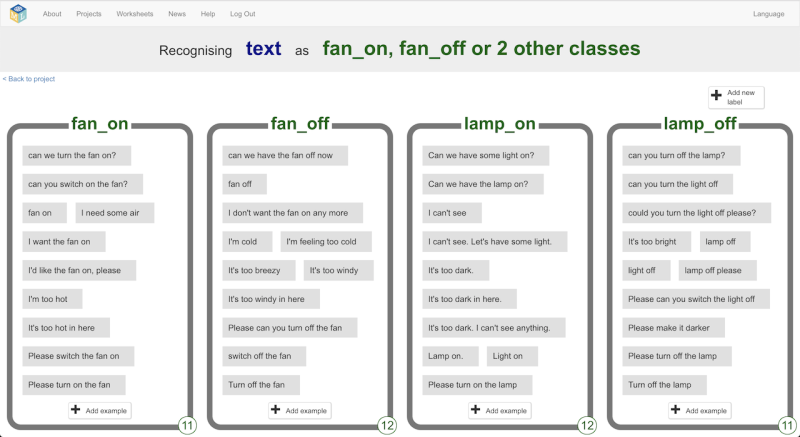
Close the Scratch window and go back to the Training tool, then click on the ‘< Back to project’ link. Click on the Train button because you need to collect some examples so that you can train the computer. To collect different examples, you need to create ‘buckets’ to put the examples in.
To create a bucket, click on ‘+ Add new label’ and call the bucket ‘fan on’. Click on ‘+ Add new label’ again and create a second bucket called ‘fan off’. Create a third and a fourth bucket called ‘lamp on’ and ‘lamp off’.
Click on the ‘Add example’ button in the ‘fan on’ bucket, and type in a command asking for the fan to be turned on. For example, you could type ‘Please can you switch on the fan’. For the ‘fan off’ bucket, you’ll need to click ‘Add example’ again and then use something like ‘I want the fan off now’. Do the same for the ‘lamp on’ and ‘lamp off’ buckets.
8. More examples for more training
Continue to add examples until you have at least six examples in each bucket. Be imaginative! Try to think of lots of different ways to ask each command.
For example:
For ‘fan on’, you could complain that you’re too hot.
For ‘fan off’, you could complain that it’s too breezy.
For ‘lamp on’, you could complain that you can’t see.
For ‘lamp off’, you could complain that it’s too bright.
More is good: the more examples you give your program, the better the program should get at recognising your commands.
Use equal numbers: add roughly the same number of examples for each command. If you have a lot of examples for one command and not the others, this can affect the way that the program learns to recognise commands.
Make the examples really different from each other: try to come up with lots of different types of examples. For instance, make sure that you include some long examples and some very short ones.
9. Start the training
You will now train the program using the examples, and then test it. The program will learn from patterns in the examples you give it, such as the choice of words and the way sentences are structured. Then, based on the patterns the program finds, it can interpret new commands.
Click on the ‘< Back to project’ link, then click on ‘Learn & Test’. Click on the ‘Train new machine learning model’ button. If you have enough examples, the program should start to learn how to recognise commands from these examples.
10. Test the training
Wait for the training to complete. This might take a minute or two but once the training has completed, a test box appears. Test your machine learning model to see what it has learned by typing in one of the commands you added to a bucket, and then press ENTER. The command should be recognised.
Now type in commands that are not in the buckets. If you’re not happy with how the computer recognises the commands, go back to the previous step and add some more examples. Then select the ‘Train new machine learning model’ button again.
Instead of writing rules for the program, you are giving the program examples. The program uses the examples to train a machine learning model. Because you are supervising the program’s training by giving examples, this machine learning approach is called supervised learning.
11. Use it in Scratch
Now update your Scratch program to include your machine learning model instead of the rules-based approach. Click on the ‘< Back to project’ link, click on Make, then Scratch 3. Here you can read the instructions on the page to learn how to use machine learning blocks in Scratch.
Click on Open in Scratch 3, then on File and ‘Load from your computer’, and select the Scratch project you saved earlier. When Scratch asks you whether to replace the current project, click on OK.
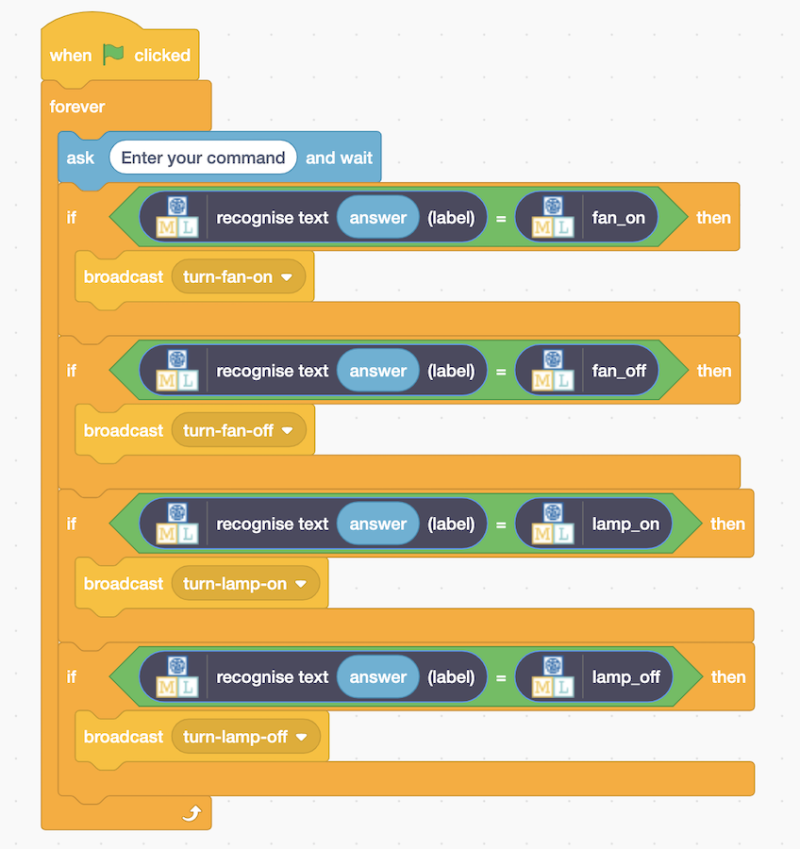
Click on the Code tab, and update your Scratch code (Figure 3) to use your machine learning model instead of the rules you first added. The ‘recognise text’ block is a new block added by your project. This new block can receive a message and return one of the four labels, based on the machine learning model you have trained.
12. Scratch AI
Click the green flag to test your new code. Test your project by typing a command and pressing ENTER on your keyboard. The fan or lamp should react to your command.
Make sure you test that this works even for commands that you didn’t include as examples in the buckets.
Save your project as before. Your Scratch smart virtual classroom now uses a machine learning model instead of a rules-based approach. Using machine learning is better than using rules, because training a program to recognise commands for itself is much quicker than trying to make a list of every possible command.
Top tip: machine learning
You need to tell an AI what to learn. The more you give it to learn with, the better it will be. The more examples you use to train the machine learning model, the better your program should get at recognising commands.
To learn about how to can improve the model with ‘confidence scores’, head to magpi.cc/smartclassroom.
Top tip: Go further
Can you get the model to tell you the weather or date? Give it a go!
Top tip: Bring more projects to life
Want to discover more great ‚makes‘? You can find this project and others on the Raspberry Pi projects website.


