Hello! I’m John from Digital Tree Media and I’m here to share some thoughts and ideas around a Twitch Extension I made for controlling our Christmas lights. Yes, I know. Great idea, let Twitch control your lights. At Digital Tree Media we have a history of taking technologies and combining them to create an experience that other people would have said was “too hard,” “impossible,” or “a really dumb idea” (OK, that last one was just our staff when I said people could control our lights).
Control The Show (CTS) has been a hobby project of mine for a few years. The original incarnation involved my old streaming setup in my bedroom at my parents’ house. Each time I have re-made the system, I have used it as an opportunity to learn new technologies, systems, and ways of working. CTS 1.0 was the reason I learned PHP back in 2011/2012.

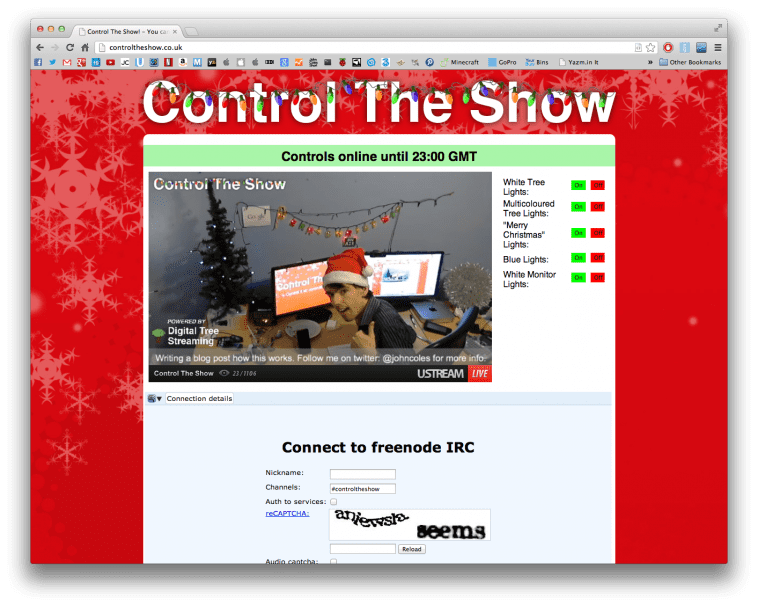
This year I decided that rather than rely on our own site and have people click on buttons, we’d have it within the video player on Twitch. In the past, we have built our own versions of interactive overlays (pre-Twitch Extensions), which we achieved by having the Twitch JavaScript player with an iFrame overlay then another container with the Twitch Player elements (play controls, volume, and fullscreen). There is one big issue with this –®define people who casually find the stream via the Twitch website would have to click away from it to control the lights. Adding one extra step usually means far fewer people will actually interact. Internally, we’ve been playing around with ideas for a Twitch Extension, and the whole concept of CTS felt like a really good fit. With that, I started building it first thing on a Sunday.
By lunchtime I had the main part of the extension working. Users could click on one of the buttons to send the command to the server, which then sent it to the plugs to turn lights off or on. After a “healthy” lunch, I started work on what I thought would make the whole experience more entertaining. By mid-afternoon, I had user-based stats working, allowing me to pull data for a leaderboard, along with assigning a person a team, based on whether they had turned more things off or on.
How does the whole system work then? Good question! As I mentioned earlier, CTS has been re-written multiple times, and this year was no exception. I had originally written the system to work on the website so I already had the code I needed to control the plugs, along with some of the security code. To add Twitch Extension compatibility, I needed to build an Extension Backend Service (EBS) and a frontend for it. The frontend was reasonably simple. A quick mashup of an image map, some javascript to scale it to the correct size, and an implementation to send the Twitch Auth token (provided as a JWT which I had never heard of), along with the request to the EBS and I was done. Then I just had to build an EBS. This part took me the longest, mainly due to my lack of knowledge on JWTs. Turns out they are an awesome little thing! My first issue with them as a n00b was selecting a library. I used my favourite bodge language of choice for CTS — PHP — which meant I had a choice of 7 different implementations. Now I did what every developer would do — I looked at which one had more stars on GitHub. Sweet. JWT = Done. I then modified the control system to accept the incoming data from the extension and log stats using the user’s identifier. I logged all the requests using the Opaque ID (as every user has one), but to appear on the leaderboard, a user has to allow me to see their actual Twitch ID.
Great, the EBS is done, now we need to do everything else. Integrating it all together was quite easy. The total creation time of the extension was around 3–4 hours of actual work spread over my Sunday. I left the office after testing the extension out and submitting it.
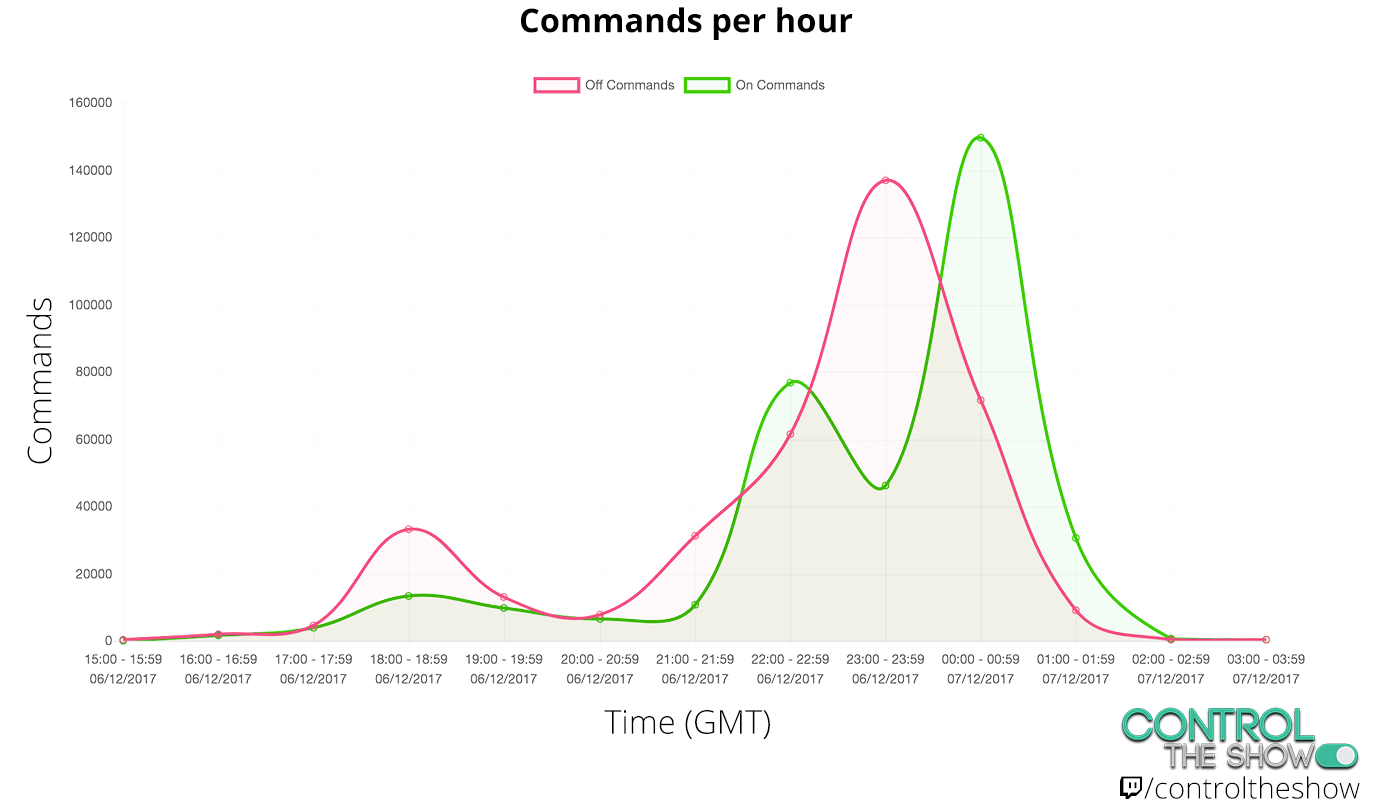
The next day, I received a reply about my submission explaining it had been denied. This was due to the lack of a config.html page for the broadcaster side and was a simple item to fix and resubmit. The extension then passed review and was available on Tuesday. Here’s what the engagement looked like for that first evening:

We peaked at 221,430 commands in an hour, which is a lot of clicking! It was rather funny walking back into the office late that night and hearing all the relays clicking on and off.
Now looking to the future, there’s a lot that I want to do with it. I’ve already started re-writing the project (again) to make better use of modern web technologies. Next year CTS will be using websockets for real-time communications, allowing the status of the devices to be shown in the Extension, along with achievements that will be shown to you as you earn them. My current plan is to bring CTS back for Halloween and Christmas each year with the actual display getting bigger and bigger.
I currently have an LED ticker that is going to be implemented to show the latest Subscribers and Cheerers along with some LED pixel mapping effects that will be included in future shows so cheering and subscribing will be even cooler! This has always been a hobby project for me and I welcome feedback from people. If you have any 240v inflatables that you’d like to send my way, feel free to let me know!
If you’re thinking of making a Twitch Extension, do it! It’s a hell of a lot of fun. I managed to make something simple that I can build on over the next year. It’s been a great learning experience from a little idea of “that would be cool” to something I now get to write about!
Website: LINK


